Pages

Friday, December 28, 2012

No Rise Cinnamon Rolls

It's been two months, today, since my last post... where does time go? I haven't forgotten about posting... Life just got in the way. While talking to a friend this week and sharing about my blog, I decided it was time for a new post!


No Rise Cinnamon Rolls

I don't have much patience when it comes to using yeast in baking and waiting for the bread to rise. Especially at 6am when I need to get breakfast going for the kids and want to make them something fun.

I came up with this recipe in a pinch one morning a few years ago and it's now my 'go-to' roll recipe. Super easy, and NO rise time~!

Ingredients:
2 cups flour
1 Tbs baking powder
2 Tbs sugar
1/2 tsp cream of tartar
1/4 tsp salt
1/2 cup butter or shortening
2/3 cup milk

1 tsp cinnamon
2-3 Tbs sugar
Prepared frosting

Stir together the dry ingredients (except the cinnamon and sugar for center of rolls) in a medium mixing bowl. Cut in the butter or shortening using a knife or pastry blender  until the mixture resembles coarse crumbs.


Add the milk all at once and stir till moistened. A soft dough will form. Turn the dough out onto a floured surface and knead dough by gently pressing and folding, 10-12 strokes or till nearly smooth.  Pat the dough out to form a rectangle and then roll the dough out to 1/4 inch thickness.


Brush the dough with 1-2 Tbs melted butter. Mix 1 tsp cinnamon and 2-3 Tbs sugar in a small bowl. Coat the dough with a generous amount of the cinnamon and sugar mix. Starting at the top of the dough (long edge, furthest away from you) begin to gently roll the dough towards you. To easily cut rolled dough, wrap a piece of string around your two index fingers [like you're going to floss with it ;) ] and slide the string under the edge of the dough. Bring the thread around the dough, and cross it at the top pulling in opposite directions. Works like a charm and doesn't squish the dough like a knife would!


Place the rolls 1 inch apart on a cookie sheet or drop them into a muffin tin. Bake at 450º for 10-12 minutes or until golden brown. Drop a Tbs or so of frosting onto each roll while still hot and allow the frosting to melt. YUM!


Sunday, October 28, 2012

Super EASY Salsa

Super EASY Salsa


A few years ago I went to a mexican themed dinner and a friend brought some semi-homemade salsa that was so good! I loved it wanted to know how she had made it. It was practically green because it had so much cilantro in it but it was delicious! The best homemade salsa I'd had.


This recipe is one I have come up with after lots of tweaking. It uses canned tomatoes and fresh veggies but the flavor is amazing (in my and my family's opinion)! You can make it as hot or as mild as you want by using fresh jalapeño or even pickled jalapeño in a jar. I have made it both ways and really like both. The fresh jalapeño adds a little more heat while the pickled jalapeños are spicy but, to me, add a little sweetness. I cut the gland and the seeds away and only use the flesh of the fresh jalapeño.


Ingredients:

1- 14.5 oz can Fire Roasted
1- 10 oz can Rotel Original
1 small bunch cilantro, rinsed and chopped, without lower stems
½ medium onion, chopped
1 clove garlic, crushed or finely chopped
1 jalapeno (more or less, to taste) seeds and gland removed


Place all ingredients in a blender or food processor and blend until smooth. About 30 seconds to 1 minute is sufficient.

Wednesday, October 24, 2012

Chicken and Pasta with Semi-Homemade Sun Dried Tomato Alfredo Sauce

In my previous post I mentioned my love for Italian. Not only do we enjoy "red" and "white" pasta sauce on a regular basis, I've recently added this sauce to the monthly dinner rotation. I believe I first had this type of sauce at Olive Garden served with my favorite entree Ravioli di Portobello. So often I have a dish at a restaurant and begin to deconstruct it in my head, hoping to figure out the ingredients and ultimately recreate it at home. I was ecstatic when this sauce came together and tasted so very similar to OG's :)


This sauce is so easy. I make it a couple of ways. The easiest bar far, is this semi-homemade version using jarred marinated sun dried tomatoes and jarred alfredo sauce. I make it a 'one-pot' dish for easy clean up!


Ingredients:
1 Tbs olive oil
2 chicken breast halves
2 Tbs. flour
2 Tbs sun dried tomatoes, chopped
1 tsp dried or fresh basil
1 cup milk
1/2 cup grated parmesan cheese
1 jar Alfredo sauce
1 box pasta, cooked according to directions


Heat 1 Tbs olive oil in a skillet. Add the chicken breast and cook until deliciously browned. Remove the chicken and set aside, reserving the drippings. Turn the flame down to med-low and add the flour. Whisk the flour into the drippings until smooth. Add the chopped sun dried tomatoes and stir. Add the basil. Heat until the mixture is bubbly. Slowly add 1 cup milk, whisking constantly. Add the parmesan cheese and continue to whisk. Add the jar of Alfredo Sauce and stir until combined. Heat through.


Chop the chicken breast into bite size pieces and add to the sauce. Add the cooked pasta and stir til combined. If the sauce seems a little sparse for the amount of pasta and chicken, add a little more milk and stir.


Monday, October 22, 2012

Sweet Sausage and Basil Spaghetti Sauce


 It's my dream to someday travel to Italy and experience the culture, the different cuisines, and the flavor influences of the different regions.  I could eat Italian several days a week and not grow tired of it. My oldest daughter is the same way. The child could eat pasta for every meal and still want more!

One of my "go to" meals on a regular basis (at least once every other week, or so) is pasta and meat sauce.  At home it's just referred to as "red sauce." We also enjoy my famous "white sauce" (Alfredo) pretty regularly as well. Sometimes on the same night!


I quit buying bottled spaghetti sauce a long time ago. Probably about the time I was home with my, then infant, daughter Madison. I had plenty of time to do "nothing" everyday while I was sitting and nursing her every 2 hrs. I found myself watching a lot of cooking shows and remember discovering Emeril. I loved that show! He made "real" food that looked amazing and relatively easy to prepare. Thus began my culinary adventures in the kitchen. After a few mediocre attempts at a homemade meat sauce, I came up with a 'no fail' recipe that was easy to duplicate each time. The only change I make now is the use of sausage or not. This recipe uses sausage.

I've used different types of sausage and really do prefer the depth of flavor that sausage gives this sauce. I've used mild italian links, sweet italian links, mild italian ground, and I've even used regular old Farmer John Breakfast Sausage links because they're less expensive than other variations of sausage. This recipe uses the sausage links 'doctored' with herbs.

Sweet Sausage and Basil Spaghetti Sauce

Ingredients:
1 - 8 oz. package Breakfast Sausage Links
1 tsp fennel seeds
1 tsp basil (fresh, or dried. I prefer fresh but use dried as well)
1 - 1.5 lbs ground meat (I use turkey)
1/2 yellow onion, diced
3 (or more) garlic cloves, crushed
1 - 6 oz. can tomato paste
1 - 15 oz. can diced tomatoes
2 - 15 oz. cans tomato sauce
1 Tbs Italian Seasoning
1 tsp basil
1 Tbs sugar (optional)


Chop the sausage into 1 inch pieces.


Place the sausage in a large sauce pot over medium heat. Add the fennel seeds and the basil. Stir and cook til just browned.


Add the ground meat and stir. Cook until ground meat is browned. Add chopped onions and pressed garlic. I use a garlic press that I absolutely love! One of the best kitchen gadgets ever.


Cook and stir the onions, garlic, and meats until the onions begin to soften. Add the tomato paste. I want to share a little cooking trick I learned... probably on some cooking show... Open the top of the paste can and remove the 'lid.' Turn the can over and open the bottom of the can as well. Hold the can over your sauce pot and press the paste through the can like a 'Push-Pop.' Remove the lid from the paste and voila! All the paste comes out of the can without much effort at all. ºÜº


Stir the paste into the meat until well incorporated and let it simmer for a minute or so to "melt." [It doesn't really melt, but once it warms and blends into the meat it's almost like it melts ;) ]


Add the diced tomatoes and stir. Let the mixture simmer for about 5-10 mins, or until the tomatoes begin to break up. You can also use some kitchen shears to snip the tomatoes into smaller pieces. Once the tomatoes are broken down, add the 2 cans of sauce and the rest of the herbs and the sugar. The sugar is optional. In my family, we like a sweet sauce. The sugar cuts the acid of the canned tomatoes though.

Cover your pot and let the sauce simmer on LOW for at least an hour. The longer it simmers the better the flavor.


Friday, October 19, 2012

Crock Pot Chicken Masala


I have a love affair with Indian Food... well, the whole Indian culture actually. I remember a time when I thought I didn’t like Indian food. Of course, I hadn't even tried it; it was an opinion I had formed based on an immature palate and spices and smells that were unfamiliar to me.

 
My first experience with Indian food was just a sampling of finger foods that included bhuja (boo-zha) – a trail-mix like snack food, jalebi (juh-lay-bee) – a fried sweet that reminds me of syrup-soaked funnel cake, and samosas (sah-moh-sahs) – a veggie (usually potato, peas, and chilies) stuffed savory pastry. I was hooked! They were all so flavorful and spicy and delicious!
Bujha


Jalebi


Samosas
 

Shortly after tasting those foods I wanted to try others and loved every bit of it…well, maybe not the goat curry ;)

 We had the privilege of actually traveling to India in October of 2010 and I have been on a mission ever since to duplicate the flavors I experienced there. (Not an easy task… I don’t think I have fully accomplished it yet, except for the chai!)  Indian food is all about the spices. If you get the spices right, you’ve got the flavor right. I believe that each dish is a labor of love. Each dish has a process and the longer it cooks the better. Some of the best, most flavorful dishes we enjoyed in India were the ones cooked at home in the kitchen by “Auntie Alice,” our generous host for a portion of the trip, and an AMAZING chicken curry cooked in a large outdoor pot in a small village in Jalandhar (town in Punjab, India). 
  
 
I experiment often with different combinations of spices and different ingredients and once in a while I get it just right. The flavor of this masala… was just right. The smell and the flavor transported me back to Punjab.
 
If I were to make this dish in a pot on the stove, I would only do a few things differently. The flavor of this dish was amazing, but the texture was a little off. (I think it was because the chicken was over-cooked). Stay tuned for that update!


Crock Pot Chicken Masala


3lbs of Chicken (I used 3 breast halves and 3 boneless, skinless thighs)
1 medium onion, coarsely chopped
2 medium tomatoes, quartered
1 (4-in.) piece of ginger, peeled and chopped into 1 in. pieces
6-8 cloves of garlic, peeled
1 tsp salt
1 Tbs turmeric
1 Tbs garam masala**
1 Tbs red chile powder
¼ cup oil
¼ cup of dried methi leaves (can substitute cilantro)
1 sm. can of evaporated milk (can substitute regular milk)
1-2 green Thai or serrano chiles, stems removed, halved lengthwise
1. Put the chicken in the crock pot whole. Do not chop the chicken or it will over cook and dry out.
 
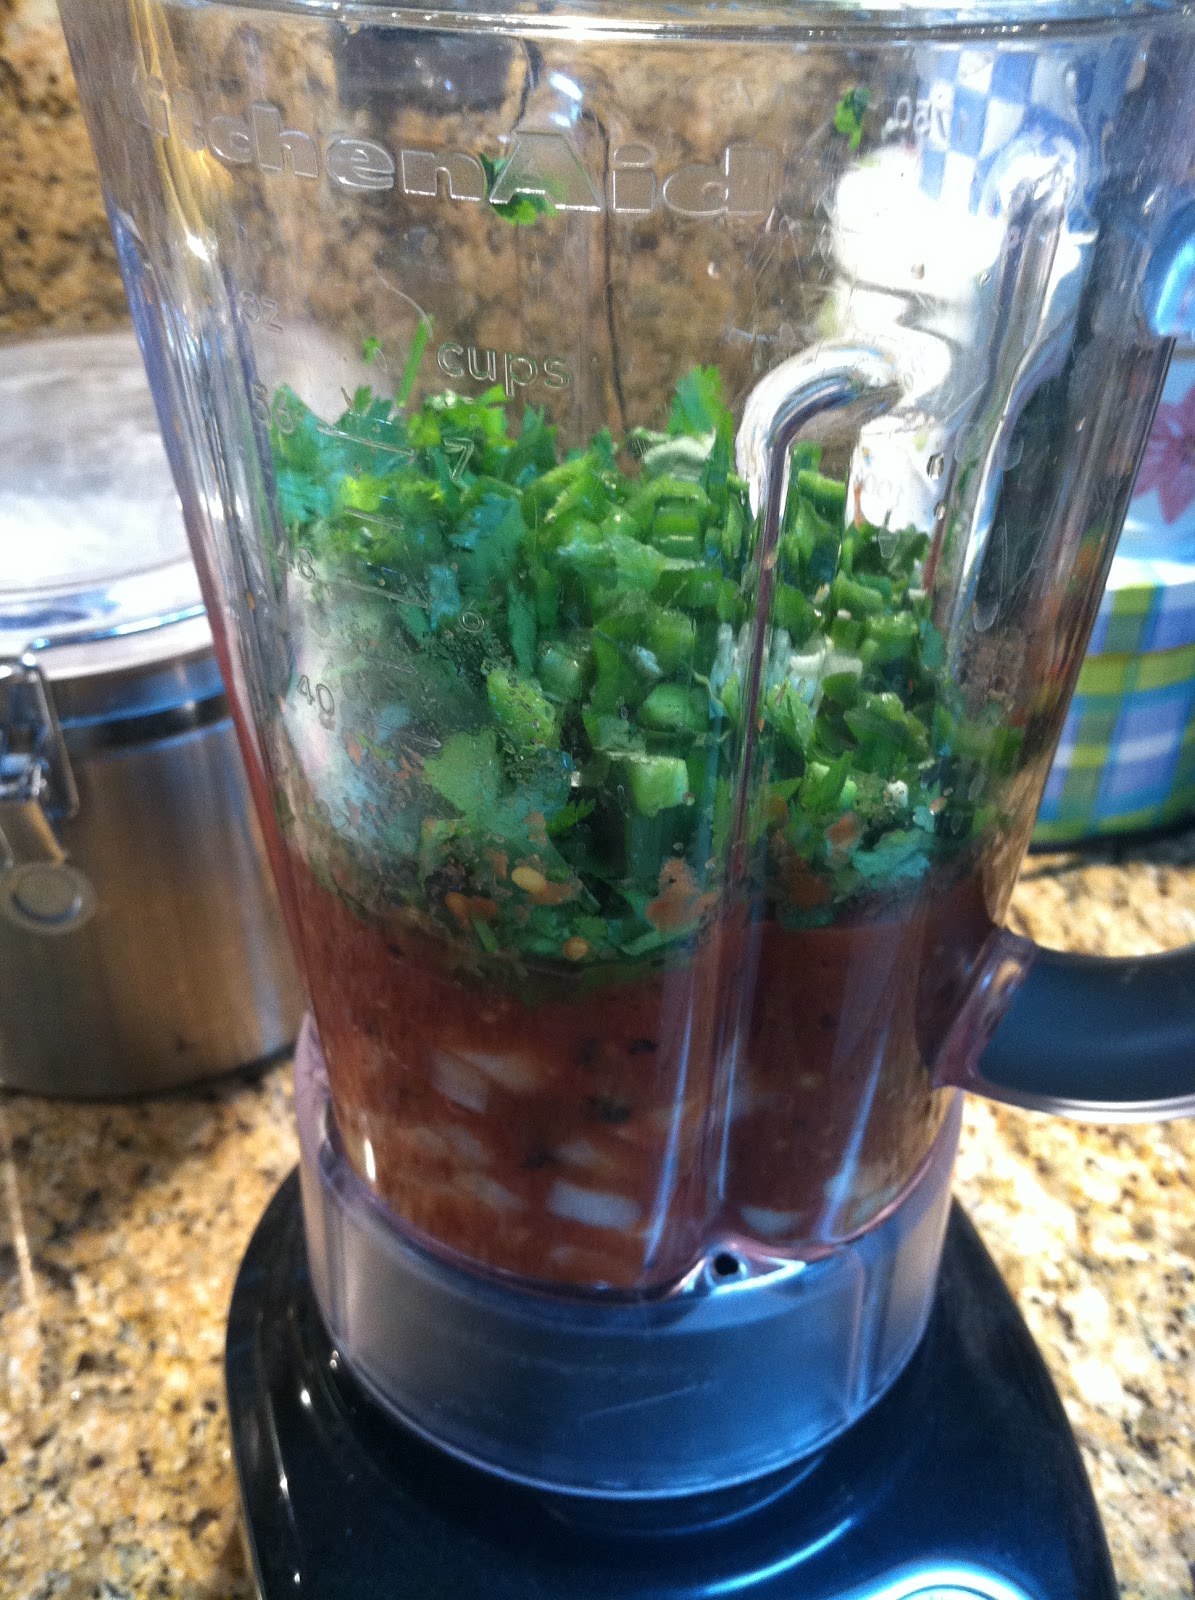
2. In a blender or food processor, blend the onion, tomato, ginger, garlic, spices, methi or cilantro, oil and milk until smooth. Poor this mixture over the chicken.
 
3. Add the chilies by sticking the slices down into the chicken and sauce.
 
4.  Cook on low for at least 4-5 hrs. (I left it in the pot for 6 hours because of our schedule and it was still delicious but the chicken got a little dried out). If you want more sauce with the chicken add ½ cup boiling water toward the end of cooking time. Remove the whole chilies if you like.
Garnish with fresh cilantro and serve over basmati rice with roti• or naan.
 
 
• In a pinch, I have used flour tortillas warmed over an open flame on the stove in place of roti. Works great!
 
** Garam Masala is a blend of pre-mixed spices you can buy at any Indian Spice or Sweets store. It’s not something typically found at a grocery store. I believe it’s a necessary component for authentic flavor. Garam Masala is comprised of roasted and ground spices: black pepper, cumin, black cardamom, cassia, clove caraway, mace, clove and ginger.  You can substitute with spices more easily available in grocery stores. Follow this link to Allrecipes.com for an Easy Garam Masala recipe.

Wednesday, October 10, 2012

Pizza Dough

    I must admit that I am a bit of a 'Pizza Snob.' I'm pretty picky when it comes to pizza. I'm not a big fan of the now popular fast food style pizza that's sitting in a warmer; ready and waiting for you to walk in and take home. There's something strange about the cheese to me... have you noticed how it gets hard and, in my opinion, plastic-like once it begins to cool?

Combination Pizza

     I much prefer pizzeria style pizza... baked fresh and made to order. Fresh ingredients. Thick and rich sauce loaded with herbs and spices and REAL cheese. I have a favorite pizza restaurant locally that serves (what I think) is the best pizza around. But what kills me is the price....over $30 for a large one-topping pizza and drinks for our family of five.

Barbecue Chicken Pizza
     When we decided to cut back on our monthly spending recently, and lessen our monthly eating out; one of the things that I really did not want to give up was pizza. Then I found this little gem of a recipe. I was a little leary at first... 'surely this isn't going to be as good as restaurant pizza...' I thought. But it was! It's fabulous! I have made it several times over the last couple of months, varying the toppings and experimenting with different sauces and everytime it's been delicious and the kids love it!


PIZZA DOUGH RECIPE
 
1 packet yeast (2 ¼ teaspoons)
1 cup warm water (at least 110º F)
1 teaspoon sugar or honey
1 teaspoon salt
2 Tbs olive oil
2 ½ cups flour
 
Pre-heat oven to 400ºF. In a large bowl, combine the yeast and the water and stir until the yeast dissolves. Add the honey (or sugar), salt, and olive oil; stir. Add the flour and stir to combine using a wooden spoon. Scrape down the sides of the bowl with the spoon to make sure all the flour is incorporated. Give it a few good "turns" around the bowl to mix well. There's no need to knead the dough. Let the dough rest at least 10 mins.
 
Spray a pizza stone or baking sheet with cooking spray. Scrape the dough out of the bowl with the wooden spoon and onto the baking sheet or stone. (I personally prefer a stone. I think it cooks more evenly and gives a nice golden crust). Flour your hands and pat the dough out to flatten. Press and push the dough out to the edges of the baking sheet. You can use a rolling pin as well, just be sure to flour the pin. The dough is sticky.
 
Top with your favorite pizza sauce and toppings and bake at 400º for about 20 minutes or until the cheese is bubbly and the crust is golden.

Monday, October 8, 2012

Clam Chowder

I traveled to Washington state a few months ago to visit my Bestie and honorary Taste Tester. It was a short, whirl-wind visit but we managed to take some time one day to go to Seattle and visit the famous Pike Place Market...home of the original Starbuck's.


Not only did I discover some of the freshest, most delicious sea food i've ever seen, I also found some amazing fresh produce, breads, and some of the most beautiful fresh flowers for cheap.


We found one fresh fish shop that also served prepared items like roasted salmon on a stick, crab cocktail, crab legs, and jumbo shrimp cocktail. We went for the crab cocktail and it was well worth the price we paid for it!


While walking through the shops and up and down the streets I was inspired. How could I come to a fish market and not buy some fresh fish? But what? Salmon? Shrimp? Halibut? Lobster?! Yum... 'Oohh! I know...clams!' (They were the cheapest for my spending budget).  'I'll make some home-made clam chowder with fresh clams for my bestie and her husband for dinner!'

I bought 5lbs. of clams (in the shells) and we stopped at the store on the way home for some other necessary ingredients: celery, onion, potato, half and half, milk, and small round loaves of bread for bread bowls.


I have made clam chowder lots of times before but never using fresh clams. There's a few things you need to do before using fresh clams. First, clean the clams under running water and scrub with a stiff brush. You don't want any sand to end up in your chowder.  Then steam the clams in a covered stock pot with a few inches of water for about 5 minutes to open the shells. Once the shells are fully opened, it's really easy to shuck the clams. Just take a spoon and scrape them away from the shell. I gave them one more rinse in a strainer, just to be sure... did I mention sand in your soup is not a good idea? :)


I kept the water from the steam pots, strained it in a screened sieve and used some of it in the soup for an extra layer of flavor. This chowder turned out so delicious. It was thick and rich and creamy and FULL of clams. I didnt even bother to chop or mince them, I just left them whole. I sliced the top off a small sourdough bread loaf, hollowed out some of the bread to create a bowl and served it up topped with a little shredded cheddar cheese.


Clam Chowder Recipe
 
• 2 Tbs. Butter
• 1/2 Large Onion
• 1 cup diced Celery
• 1 Large Potato (peeled and diced)
• Water ( enough to cover the potatoes in the pot)
• Chicken Bouillon cube
• 2 cups Milk
• ¼ cup flour
• 1 Pint Half &Half
• ½ to 1 cup Clam Juice (reserved from steam pot, strained)
• Tbs Old Bay Seasoning (Or any seafood seasoning)
• Pinch of Thyme
• Salt and Pepper to taste
• 5 lbs. Clams in the shell - Yielded about 2½ to 3 cups shucked clams (Canned is ok if you don't
have fresh, but fresh is so much better. If you must use canned, use at least two 6.5 oz cans with
their juice)
 
Dice half a large onion and enough celery stalks to yield a cup of each. Wash, peel and dice the potato, set aside. Melt the butter in a large soup pot and saute' the celery and onion until the onion starts to carmelize. Add the diced potato and give it a quick stir. Add enough water to just cover the potato and veggies. Drop a chicken bouillon cube into the pot and bring to a boil. Boil for 6-8 minutes, or until the potatoes are tender.
 
While the potatoes are simmering, make a 'slurry' with one cup of milk and the ¼ cup of flour. Place both in a jar or if you have one, a 'shaker cup.' You know... one of those protein shake cups with the little whisk ball inside or the lid that has a grate. Either way, give it a good shake to mix well.
 
Once the potatoes are tender, add the slurry. It will thicken quickly. As soon as it thickens, slowly add the other cup of milk, stirring constantly. Use the reserved clam juice to thin further if necessary. Let the soup come back up to a simmer and add the half & half. Add the Old Bay Seasoning, thyme and salt and pepper to taste. Simmer until it thickens. Add the clams and gently stir. Let the chowder simmer for just a few minutes or until the clams are heated through.


Sunday, October 7, 2012

Welcome!


    For some time now I've been contemplating creating a food blog... becasue, you know, i've got so much time on my hands! Hah! As a mom, wife, and self proclaimed gym-rat; I really don't have all that much time to begin a blog.  But the truth is that I make time to cook for my family everyday...one of my favorite things to do...so why not create a food blog?  Everytime I create something new and delicious I take pictures of the cooking process and pictures of the finished product because in the back of my mind I knew I would want to share it with someone, somehow, somewhere. Now I have a place to do just that.

    The name "Smack Yo' Momma That's Good!" name comes from a quip I once heard. I can't exactly remember if it was from Emeril Lagasse or Guy Fierri or somewhere else, but when something's really good upon taste testing, more times than not (if there's someone home to hear me) I'll shout "Smack Yo' Momma That's Good!"  Of course I don't actually codone smacking yo' momma, but when something tastes really good you've got to at least do a little happy dance or something!

    I want this blog to be a place where I can share my thoughts, share my crafting, share my culinary discoveries, and even share diet and fitness tips. Thanks for stopping by... recipes are coming soon!

-Shelly